I have had 2 friends now with Windows 7 computers attempt to install Windows 10 and ran into an issue where their computer sits with the spinning dots for hours.
They launched the install process by clicking on the Windows Update Icon in the notification area on the bottom right of their screen. This brings up a window with the rotating dots. If this lasts more than 10 minutes do the following:
Close that window - x it down
click on the Start icon
Type "Windows Update"
Install Windows 10 from there
I have not seen this problem when updating from Windows 8.
Tuesday, August 11, 2015
Saturday, August 1, 2015
Clean Installation of Windows 10 on the Yoga Tablet 2 10"
My Yoga Tablet 2 10" originally came with Windows 8.1. I was very impressed with it from the day bought it and that hasn't changed. I have wanted, for a long time, to put Windows 10 on but I was afraid that I would brick it with the preview versions. Windows 10 was released on July 29th so, now is the time
 The Tablet came with only 32GB for the C: Drive and by the time I wanted to upgrade I had applications and data that only left 7GB of free space. So, I thought I would really like to have a clean install of Windows 10 and then re-install all my apps and data.
The clean installation meant the I would have to download the ISO, install it and run it from a USB flash drive. As you may know Windows 10 uses lots of CPU power, and battery and takes a long time. The Yoga has only one USB port and that is the same USB port is used to power it. With full power that really shouldn't be a problem but I didn't want to risk running out of power during the installation. I needed a better solution.
I was watching the TWIT TV show Windows Weekly. One of the hosts, Paul Thurrott, suggested that you could simple upgrade to Windows 10 and then do a system recovery. What a great idea!
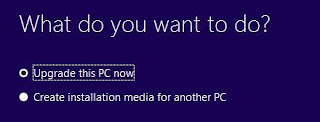 I had just over 7GBs free when I started. I downloaded and ran the Media Creation Tool selected "Upgrade this PC now" and 2 hours or so later, Windows 10 was installed and running. The tool would only run if I was attached to power. All my apps and data were preserved but I was now limited to 2GBs of free space on the C: drive. I used the Tablet this way for 2 days and then decided to do the recovery.
This is a simple process: Settings - Update and Security - Recover - Reset this PC I chose to get rid of all apps and data. After the installation, I restored my apps and data from the latest backup and I have 17GBs free That's quite a change. There was one little scare though - the Yoga originally came with Lenovo's camera app. I couldn't find that camera app in either the Microsoft Store or on the Lenovo support web site.. It was lost in the upgrade, but it turns out, there is a Windows Camera App, that works just fine, built in to Windows 10.
Overall, I am very happy with Windows 10 on my Yoga Tablet 2 10" The performance is amazing!
 The Tablet came with only 32GB for the C: Drive and by the time I wanted to upgrade I had applications and data that only left 7GB of free space. So, I thought I would really like to have a clean install of Windows 10 and then re-install all my apps and data.
 The clean installation meant the I would have to download the ISO, install it and run it from a USB flash drive. As you may know Windows 10 uses lots of CPU power, and battery and takes a long time. The Yoga has only one USB port and that is the same USB port is used to power it. With full power that really shouldn't be a problem but I didn't want to risk running out of power during the installation. I needed a better solution.
I was watching the TWIT TV show Windows Weekly. One of the hosts, Paul Thurrott, suggested that you could simple upgrade to Windows 10 and then do a system recovery. What a great idea!
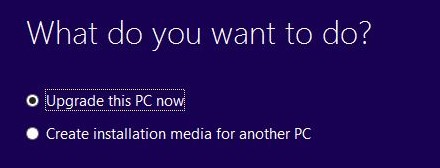 I had just over 7GBs free when I started. I downloaded and ran the Media Creation Tool selected "Upgrade this PC now" and 2 hours or so later, Windows 10 was installed and running. The tool would only run if I was attached to power. All my apps and data were preserved but I was now limited to 2GBs of free space on the C: drive. I used the Tablet this way for 2 days and then decided to do the recovery.
This is a simple process: Settings - Update and Security - Recover - Reset this PC I chose to get rid of all apps and data. After the installation, I restored my apps and data from the latest backup and I have 17GBs free That's quite a change. There was one little scare though - the Yoga originally came with Lenovo's camera app. I couldn't find that camera app in either the Microsoft Store or on the Lenovo support web site.. It was lost in the upgrade, but it turns out, there is a Windows Camera App, that works just fine, built in to Windows 10.
Overall, I am very happy with Windows 10 on my Yoga Tablet 2 10" The performance is amazing!
Thursday, July 30, 2015
Installing Windows 10
When I first reserved my copy of Windows 10 through the icon on the bottom right of my computer I kind of thought that I would get it the first day, especially since I was part of the Windows Insider Program. When you think about it though, there a hundreds of millions of Winodws 7 and 8 computers in the world to upgrade
I really want to run Windows 10 on all my devices and since it didn't download automatically yesterday, I decided to get it myself.
Here is how:
Go to: Windows 10 Creation Tool Download
Determine whether your computer is 32 or 64 bit. Click Win - E (Windows Key + E)
Right click on "This PC" then click on properties.
System type will tell you whether you have a 32 bit or 64 bit OS.
My computer is a 64 bit so I clicked on "Download Tool Now (64 bit Version)"
After running the Tool this appears:
 Now Click - Next
Once the download has completed, the installation will take just about an hour depending on the speed of your computer.
I really want to run Windows 10 on all my devices and since it didn't download automatically yesterday, I decided to get it myself.
Here is how:
Go to: Windows 10 Creation Tool Download
Determine whether your computer is 32 or 64 bit. Click Win - E (Windows Key + E)
Right click on "This PC" then click on properties.
System type will tell you whether you have a 32 bit or 64 bit OS.
My computer is a 64 bit so I clicked on "Download Tool Now (64 bit Version)"
After running the Tool this appears:

Once the download has completed, the installation will take just about an hour depending on the speed of your computer.
Tuesday, July 28, 2015
Skype - Guess What!
I was about to run the Skype Universal App in Windows 8.1 and guess what I got.

I talked about this in a previous post and I knew that the Universal App was not supported in Windows 10 but I did not expect it to happen while I was still running Windows 8.1.
Skype made the install process easy though. I simple clicked on the Download Skype Button it installed. I did have to remember my Skype user ID and password.
One more thing - go to the Start Menu right click on the Skype Icon and uninstall the Universal App.
Friday, July 24, 2015
Installing Windows 10 over Windows 8.1
 With Windows 10 roll-out starting on Wednesday, I have downloaded to Disk Image (ISO) which is available to Windows Insiders and have decided to install it on my main computer currently running Windows 8.1. This image is labelled Windows 10 Preview 10240 and is thought to be what will be rolling out on Wednesday with updates.
Having installed many Window 10 previews over the past few months as a Windows Insider, I didn't expect any problems with this version but just in case, I first copied the current Windows 8.1 hard drive (SSD) to a new drive. If there is a problem I have to opportunity to return to Windows 8 simply by replacing the hard drive in my laptop.
Most people will have Windows 10 downloaded into there system and will start the installation that way. The installation process is over a hour so, don't start it too late in the day. If you are a Windows 8 user there will be a lot of work after the installation is complete.
 There are a couple of things you should know prior to starting the installation. You will need to know your Microsoft ID and password as well as your Skype ID and password if, like me, you are a Skype user. Skype for Windows 8, the universal app, will no longer run. You will need to download and install Skype for Desktop and the download icon will be on your Windows 10 menu. Also, Windows Media Center is also not supported by Windows 10 so if you have it on Windows 8.1 or on Windows 7 it will be uninstalled during the Windows 10 installation process. However, most people do not have Windows Media Center and don't have to worry about that.
The installation went very smoothly and after about a hour and a half I was up and running.
.
My Windows 10 test environment
 |
| Lenovo R61 with Windows 10 |
A little background on my main computer the T520.
 |
| Lenovo T520 with Windows 10 |
When Microsoft introduced the Windows 10 Insiders program, I was anxious to get involved. I dug out my old hard drive - still with Windows 7. Swapped it into my computer and Installed Windows 10. Every day, I would swap it in and out of my computer. When I wanted to use my day-to day applications I would swap in my SSD with Windows 8 and when I wanted to test and work with Windows 10 I would remove the SSD and replace it with the Windows 10 hard drive.
Friday, July 17, 2015
Navigating "All Apps" in Windows 10
If you are like me you have lots and lots of apps / programs on your system and the "All Apps" part of the menu is sometimes difficult to navigate to what you are trying to find. Here is a little tip that might help.
If you would like to navigate to "Microsoft Office" for example, here is what you can do:


3 Select Microsoft Office - Nice and Easy
1. Click on the Menu Icon - All Apps and then click on any group letter like "B" shown here.

2, Click on the "M":

3 Select Microsoft Office - Nice and Easy
Of course, you can always click on Menu Icon and just start typing "Excel" and launch it that way or just ask Cortana to "Run Excel" Many people, however, have just gotten used to exploring the menu to find what they want.
Subscribe to:
Posts (Atom)