I just got an unexpected upgrade for my Samsung Galaxy Note 10.1 (2014 Edition) which I purchased in November 2013. The tablet originally came with Android Ice Cream Sandwich and was upgraded in 2014 to Jelly Bean.
This update skipped Kit Kat and went directly to Lollipop. A very nice surprise!
Friday, December 4, 2015
Monday, November 30, 2015
Cast your Windows 10 PC screen to your TV using Miracast
There are times when you are using your PC or tablet to
watch a Movie, YouTube Videos or just want to view your PC screen on a larger
device. There are a few different ways
to do this of course including using Google’s Chromecast. But for this Blog Post I would like to talk
about another technology industry standard called Miracast.
If you have a Smart TV like the Samsung, Miracast is built in to the TV. Not all of us have a Smart TV and, in my case, I want to use an Epson Projector as my device. If you don’t own a Smart TV you will need a relatively new TV with an HDMI input port. All flat screen TVs have at least one HDMI port.
 There are a number of Miracast adapters you can purchase to
add to your TV. I have two. The first is a Netgear Push to TV 3000
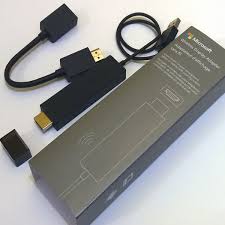
(PTV3000) and the second is a new device, I will be using and talking about
here, called a Microsoft Wireless Display Adapter. I purchased it a Best Buy for $49.95. It is simple to attach to your TV – simply
plug one end into the HDMI port and the other end into the USB adapter to
supply the power.
There are a number of Miracast adapters you can purchase to
add to your TV. I have two. The first is a Netgear Push to TV 3000
(PTV3000) and the second is a new device, I will be using and talking about
here, called a Microsoft Wireless Display Adapter. I purchased it a Best Buy for $49.95. It is simple to attach to your TV – simply
plug one end into the HDMI port and the other end into the USB adapter to
supply the power.


1. At the bottom right of your screen click on the Action Center


3. Return to the Action Center – Click on Connect

4. Select “Microsoft Display Adapter” and Connect, wait a few seconds until your screen appears on the TV
5. Have Fun!
If you have a Smart TV like the Samsung, Miracast is built in to the TV. Not all of us have a Smart TV and, in my case, I want to use an Epson Projector as my device. If you don’t own a Smart TV you will need a relatively new TV with an HDMI input port. All flat screen TVs have at least one HDMI port.
There are a number of Miracast adapters you can purchase to
add to your TV. I have two. The first is a Netgear Push to TV 3000
(PTV3000) and the second is a new device, I will be using and talking about
here, called a Microsoft Wireless Display Adapter. I purchased it a Best Buy for $49.95. It is simple to attach to your TV – simply
plug one end into the HDMI port and the other end into the USB adapter to
supply the power.
I will be talking about how to connect a Windows 10 device
to display on your TV. First though, I
should mention that older laptop PC’s, I have one that I upgraded from Windows 7,
may not have Miracast capability.
Devices that do work are most newer systems – I have personally tested
it with a Lenovo T530 laptop, 2 different 10”
Windows 10 tablets that originally came with Windows 8 – Lenovo Tablet 2
and HP - 10-N011CA and a ASUS T100TFA that came with Windows 10 installed.
Now that you have your Miracast device attached to your TV,
use the “Source” or “Input” button of the TV remote to navigate to the HDMI
Port that the adapter is attached to.
You should see a Microsoft Wireless Display Screen.
This is how to cast your Windows 10 display to your TV.
1. At the bottom right of your screen click on the Action Center
2. Click on "Project" and then select "Duplicate."

3. Return to the Action Center – Click on Connect

4. Select “Microsoft Display Adapter” and Connect, wait a few seconds until your screen appears on the TV
Wednesday, November 18, 2015
How to customize your backgroud in Windows 10
Part of getting a new computer or a new operating system is to make it your device. You can do this by changing the desktop backgrounds to photo or themes you are comfortable with. This blog post will help you get one of those themes.


1.
Click on Start

2.
2. Now Settings

3.
Now Personalize

4.
Select Themes

5.
Select Theme Settings

6.
Now Get Themes Online

7. Now search for and select the Theme you like.

Saturday, October 17, 2015
Safe Mode was not so safe for me
I recently purchased a new Epson wireless projector for the
classes I run while I am in Florida. I
was hoping for the wireless to be the industry standard Miracast. I really wanted to be able to connect all my
devices to the projector simply and easily.
Instead, I needed to install Epson software on each computer and
tablet.
After playing with Epson’s wireless system for an entire day,
I decided that I would give up on it.
So, I decided that I would attach a Miracast device (Netgear PTV 3000)
to the HDMI port on the projector and use Miracast on my computer and Android
Tablet. Which works fine I might
add. Getting there was a bit of a
problem.
The computer I use is a Yoga Tablet 2 with Windows 10. It has a touch screen and a wireless
Bluetooth keyboard. I had installed the
Epson wireless software (EasyMP) on it while I was doing my testing. The software worked well while I was
connected to the projector but it added an audio driver that Interfered with
the audio on my system when I wasn’t wanting to project. So, now that I have decided to go with
Miracast, I wanted to uninstall the Epson Software (EasyMP). It turns out that it would not uninstall. It says that it cannot do the uninstall while
it is in use and I wasn’t using it at the time.
I disabled the audio driver but that didn’t help either. So, here is where the story starts.
I decided that the easiest way to uninstall it would be to
boot up in Safe Mode and do it from there.
To get to Safe Mode I went to the command prompt – typed msconfig
– then selected Boot and Safe Mode. I
rebooted my system and it came up with my userID asking for my password. As it
turns out, touch screen doesn’t work in Safe Mode and neither did my Bluetooth
keyboard.
I now have an Electronic Brick with no way to get
started. Even rebooting didn’t
help. It came right back to the sign in
screen. Very very scary!
After the scare settled, I thought of a possible solution. I ran out to a nearby Source store, purchased
a wireless (USB) keyboard, mouse and batteries.
Just $40 later I was able to sign in – uninstall the Epson software and
reboot back to my normal Windows 10 environment. It is so nice to have my touch screen and my Bluetooth
keyboard back.
Thursday, September 17, 2015
Installed IOS 9 on my iPad
 I have an iPad 3 and last night, I installed IOS 9. IOS 9 is the latest operating system for the iPad. The nice thing is that Apple will still allow older iPads to get their new operating system when other manufacturers obsolete their tablets after the second release of the OS that is installed
 IOS 9 now has the ability to do multitasking but only on the very new iPad like the iPad 2 mini. This is a feature that Android has had for a couple of years now and will work on any model that has the OS that supports it. It doesn't work on my iPad 3 nor does the battery saving functions. When you boot up your iPad there really isn't anything that even catches your eye.
The major feature is Siri's natural language recognition - this works well and it is terrific! It is worth spending the time to upgrade.
Sunday, September 13, 2015
Replacing a laptop hard drive with a much faster SSD
 Many people are unaware that the slowest device on your computer is the hard drive. That is because it is actually a mechanical device that has a moving arm and a rotating disk that has to accurately place your data on it and retrieve it again upon request. When your computer wants to get a piece of data the arm must move to an index to find out where the data is stored on the disk then move the arm again to exactly the right track and rotate the disk to the exact spot. That takes an enormous amount of time in the computers world. Well now, there is an inexpensive answer to that and it is called an SSD or Solid State Drive. This device has no mechanics in it. It has no moving parts, only, very very fast electronics and can speed up your computer tremendously.
Until recently SSD were very expensive. But now, they are very cheap when you consider the dramatic difference in speed you get when you install one. They are also very easy to install.
The Cost:

I recently installed a Transcend 512GB SSD on my laptop. I purchased it on Amazon for $215 Canadian (it is also available for $170US on Amazon.com). Just search for "Transcend 512GB SSD"
Installation:
 You first need to copy you current hard drive to the SSD. To do this you will need either a cable attachment shown in the picture or a SATA III enclosure which you can purchase for $10 to $30 and any compute store. You can put your old hard drive in it later and use it as a backup device. The Transcend comes with detailed instructions on do that copy and it is really easy.
All systems are different but are just as easy. The Thinkpad has 2 rubber bumpers that detach and a tray that the drive sits in. The tray holds the drive with 4 small screws:
1. Remove the screws
2. Slip the drive out of the tray

 4. Replace the rubber bumpers
5. Place the drive back into the computer and replace the cover.
That's it!
Plug the computer back in and turn it on - you will be very impressed with the speed, not just for the first few minutes but every time you use your computer.
Tuesday, August 11, 2015
Problems Upgrading Windows 7 to Windows 10
I have had 2 friends now with Windows 7 computers attempt to install Windows 10 and ran into an issue where their computer sits with the spinning dots for hours.
They launched the install process by clicking on the Windows Update Icon in the notification area on the bottom right of their screen. This brings up a window with the rotating dots. If this lasts more than 10 minutes do the following:
Close that window - x it down
click on the Start icon
Type "Windows Update"
Install Windows 10 from there
I have not seen this problem when updating from Windows 8.
Subscribe to:
Posts (Atom)